Installing Terraform and the CLI Workflow
Overview
Before you can plan or apply infrastructure, you need a pinned Terraform CLI, a clean project directory, and clarity on when providers download (at init, not at OS package install). Platform teams standardise versions so CI and laptops produce identical plans. HashiCorp publishes signed binaries; version managers (tfenv, asdf) make switching between project pins practical.
The Terraform Registry hosts provider plugins. Your terraform block declares required_providers; terraform init downloads matching binaries into .terraform/providers/. Understanding install vs init prevents the common mistake of “Terraform is installed but plan fails — provider not found.”
This is Tutorial 2 in Module 2: Installing Terraform of the REBASH Academy Terraform for Cloud & DevOps Engineers series — written for Cloud, DevOps, Platform, and SRE engineers. You will install and verify the CLI, pin versions in HCL, initialise providers from the Registry, and document evidence suitable for an onboarding checklist.
Prerequisites
- Introduction to Terraform and IaC
- Ubuntu 22.04/24.04, macOS, or Linux with
curl,unzip, and network access - Optional: Linux package management familiarity
Learning Objectives
By the end of this tutorial, you will be able to:
- Install Terraform from HashiCorp packages or a version manager and verify
terraform version - Pin CLI and provider versions with
required_versionandrequired_providers - Explain when providers install and where they live on disk after
init - Use core CLI verbs:
version,fmt,validate,init, and-help - Produce install and init evidence files for team standards
Architecture
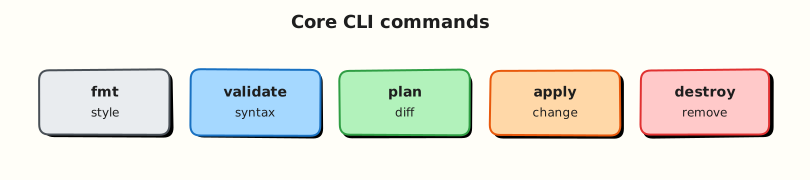
The Terraform CLI is a single binary. Provider plugins are separate executables discovered at init time. Version constraints in HCL drive which plugin builds download from the Registry.
Theory
What it is
Terraform installation means placing the terraform CLI on your PATH at a version compatible with your organisation’s modules. Installation does not include AWS, Azure, or Kubernetes providers — those are plugins resolved per project.
| Artefact | When it arrives | Typical location |
|---|---|---|
| Terraform CLI | OS install, package manager, tfenv, asdf | /usr/bin/terraform or ~/.tfenv/versions/... |
| Provider plugins | terraform init in a project | .terraform/providers/ |
| Lock file | First successful init with 1.1+ | .terraform.lock.hcl (commit to Git) |
| Modules | terraform init | .terraform/modules/ |
The Terraform Registry (registry.terraform.io) is the default source for public providers and modules. Private registries (Terraform Cloud, Artifactory) use the same init mechanism with different source addresses.
Why it matters
Version skew causes expensive mistakes:
- Engineer A plans with Terraform 1.4; CI applies with 1.9 — different validation rules or state format expectations
- Provider
~> 5.0resolves to 5.40 on Monday and 5.41 on Friday — unexpected attribute defaults change plans - “Works on my machine” when
.terraform/is gitignored but lock file is missing
Production teams document:
- Approved Terraform versions per repo or monorepo
- How to install (package vs tfenv vs container image in CI)
- That every root module commits
.terraform.lock.hcl
How it works
Installation methods
| Method | Best for | Notes |
|---|---|---|
| HashiCorp apt/yum repo | Servers and golden images | GPG-signed packages; pin package version |
Official zip + PATH | Quick lab setup | Verify checksums from releases.hashicorp.com |
| tfenv | Multiple projects, different pins | tfenv install 1.9.8; .terraform-version file |
| asdf | Polyglot teams (Node, Python, Terraform) | asdf plugin add terraform; .tool-versions |
| Container image | CI pipelines | hashicorp/terraform:1.9 — pin tag, not latest |
Verify after install:
CLI essentials
| Command | Purpose |
|---|---|
terraform version | CLI build; -json for automation |
terraform -help | Subcommand discovery |
terraform fmt -recursive | Format .tf files |
terraform validate | Check configuration syntax and consistency (after init) |
terraform init | Providers, modules, backend |
terraform providers | List required providers in tree |
Full workflow commands (plan, apply, destroy) are Module 3.
Provider installation model
- Configuration declares:
terraform initreads constraints, queries Registry, downloads plugin for OS/architecture, writes.terraform.lock.hclwith checksums.- Later inits use lock file unless
-upgraderequests newer versions within constraints.
Providers are not global npm packages — each project directory has its own .terraform/ tree (unless using shared plugin cache — advanced).
Version management
tfenv example:
asdf example:
Match required_version in HCL with the active CLI:
Common pitfalls
- Committing
.terraform/directory — large, machine-specific; commit lock file instead. - Using
latestTerraform in CI — pin image tag or tfenv version per branch. - Running
validatebeforeinit— validation needs provider schemas; init first. - Ignoring GPG/checksum verification when downloading zip manually.
- Mixing Homebrew Terraform on macOS with corporate tfenv policy without documenting which wins on
PATH.
Hands-on Lab
Objective
Install or verify Terraform, create a version-pinned root module with the kreuzwerker/docker provider, run terraform init, capture provider install evidence, apply a real Docker network, and prove it with docker network ls.
Prerequisites
- Terraform ≥ 1.5 (
terraform version) - Docker Engine running (
docker infosucceeds) - Network access to
releases.hashicorp.comandregistry.terraform.io - Completed Module 1 concepts (IaC workflow)
Lab environment
Workspace: ~/rebash-terraform/module-02
Uses kreuzwerker/docker against local Docker Engine.
Real-world scenario
Your platform team publishes a golden Terraform version (1.9.x) and requires every repo to commit a lock file after init. Ticket PLAT-102: prove your laptop matches the standard, pin the Docker provider, show .terraform/providers/ contains the expected plugin binary, and apply a disposable bridge network before Module 3 expands the stack.
Step-by-step tasks
Task 1 – Record CLI install evidence
Create install-check.sh:
#!/usr/bin/env bash
set -euo pipefail
cd ~/rebash-terraform/module-02
terraform version | tee terraform-version.txt
terraform version -json | tee terraform-version.json
grep -q '"terraform_version"' terraform-version.json
echo "CLI evidence OK" | tee cli-evidence.txt
Run:
chmod +x ~/rebash-terraform/module-02/install-check.sh
~/rebash-terraform/module-02/install-check.sh
Expected output
terraform-version.txt shows Terraform v1.x.x; cli-evidence.txt contains CLI evidence OK.
If Terraform is missing, install via HashiCorp packages (Install Terraform) or tfenv, then re-run the script.
Task 2 – Pin CLI and Docker provider in HCL
Create versions.tf:
terraform {
  required_version = ">= 1.5.0, < 2.0.0"

  required_providers {
    docker = {
      source  = "kreuzwerker/docker"
      version = "~> 3.0"
    }
  }
}

provider "docker" {}
Create main.tf:
Expected output
versions.tf and main.tf exist with pinned source and version for the Docker provider.
Task 3 – Init, apply, and verify Registry provider layout
Run:
cd ~/rebash-terraform/module-02
terraform fmt -recursive
terraform init | tee init-output.txt
test -f .terraform.lock.hcl
find .terraform/providers -type f | tee provider-files.txt
grep -q 'kreuzwerker/docker' provider-files.txt
terraform providers | tee providers-tree.txt
terraform apply -auto-approve | tee apply-output.txt
docker network ls --filter name=rebash-module-02-net --format '{{.Name}}' | tee docker-net.txt
grep -q 'rebash-module-02-net' docker-net.txt
echo "provider install evidence OK" | tee provider-evidence.txt
Expected output
init-output.txt shows Docker provider installed; provider-files.txt lists plugin binaries under .terraform/providers/registry.terraform.io/kreuzwerker/; docker-net.txt contains rebash-module-02-net; provider-evidence.txt contains provider install evidence OK.
Validation steps
-
terraform versionoutput saved and shows 1.5+ -
required_versionandrequired_providersblocks present inversions.tf -
.terraform.lock.hclcreated after init - Provider binaries exist under
.terraform/providers/ -
terraform applycreated a real Docker network visible indocker network ls
Common errors and fixes
| Error | Cause | Fix |
|---|---|---|
terraform: command not found | Not installed or wrong PATH | Install CLI; hash -r; check which terraform |
Cannot connect to the Docker daemon | Docker not running | Start Docker Engine; verify docker info |
does not match configured version constraint | CLI too old for required_version | Upgrade Terraform or adjust constraint in lab only |
Failed to query available provider packages | Network or registry outage | Retry; configure HTTPS_PROXY; use air-gap mirror if corporate |
validate fails before init | Providers not installed | Run terraform init first |
Challenge exercise
Create pin-report.sh:
#!/usr/bin/env bash
set -euo pipefail
cd ~/rebash-terraform/module-02
grep -q 'required_version' versions.tf
grep -q 'kreuzwerker/docker' versions.tf
test -s .terraform.lock.hcl
terraform version -json | python3 -c "
import json, sys
v = json.load(sys.stdin)['terraform_version']
parts = v.split('.')
assert int(parts[0]) >= 1
print('pinned toolchain OK', v)
" | tee pin-report.txt
docker network inspect rebash-module-02-net --format '{{.Name}}' | grep -q rebash-module-02-net
Run:
chmod +x ~/rebash-terraform/module-02/pin-report.sh
~/rebash-terraform/module-02/pin-report.sh
Expected output
pin-report.txt contains pinned toolchain OK with your version string; network inspect succeeds.
Learning outcomes
- You verified CLI version and captured JSON evidence for automation
- You pinned Terraform and the Docker provider using Registry
sourceaddresses - You understand providers download at
initinto.terraform/providers/ - You applied real infrastructure and proved it with the Docker CLI
Cleanup
cd ~/rebash-terraform/module-02
terraform destroy -auto-approve
rm -f terraform-version.txt terraform-version.json cli-evidence.txt \
  init-output.txt provider-files.txt providers-tree.txt apply-output.txt \
  docker-net.txt provider-evidence.txt pin-report.txt
rm -rf .terraform .terraform.lock.hcl terraform.tfstate terraform.tfstate.backup
Validation
- Completed lab under
~/rebash-terraform/module-02with provider path and Docker network evidence - Can explain difference between CLI install and
terraform init - Used
terraform version,fmt,init, andapplysuccessfully - Can describe one production failure mode (e.g. missing lock file in CI)
Code Walkthrough
- Pin before init —
required_providersbelongs in Git before anyone runs init locally. - Commit lock file —
.terraform.lock.hclprevents silent provider upgrades across laptops and CI. - Evidence scripts — onboarding checklists should be executable (
install-check.sh), not PDFs. - Separate CLI from plugins — troubleshooting “provider not found” starts with
init, not reinstalling OS packages. - Match CI image — pipeline Terraform version must satisfy every module’s
required_version.
Security Considerations
- Download Terraform only from HashiCorp releases or signed package repos; verify checksums.
- Treat
.terraform/as build output — it can be recreated; do not share it as a secret store. - Lock files include provider checksums — commit them to detect supply-chain tampering on init.
- Restrict write access to CI roles that run
init -upgrade— upgrades change lock files organisation-wide. - Do not embed cloud credentials in install scripts; providers authenticate separately (Module 5).
Common Mistakes
Assuming terraform install includes AWS
The CLI alone cannot plan AWS resources until init downloads hashicorp/aws.
Fix: Document “clone repo → tfenv use → terraform init” in README.
Gitignoring the lock file
Without .terraform.lock.hcl, teammates resolve different provider builds.
Fix: Commit lock file; use -upgrade intentionally in upgrade PRs.
Floating required_version = ">= 1.0"
Too-wide constraints hide CI drift until a breaking release.
Fix: Upper bound (< 2.0.0) plus documented upgrade cadence.
Running init as root habitually
Init as root creates root-owned .terraform/ — friction for normal users.
Fix: Run as your deployment user; fix ownership if needed.
Best Practices
- Add
.terraform/to.gitignore; never ignore.terraform.lock.hcl. - Document one blessed install path (tfenv +
.terraform-version) in team handbook. - Run
terraform fmt -check -recursivein CI on every pull request. - Pin provider versions with pessimistic constraint operator (
~> 5.0) not bare>=. - Mirror Registry in air-gapped environments rather than disabling verification.
Troubleshooting
| Symptom | Likely cause | Fix |
|---|---|---|
| Wrong Terraform version active | Multiple installs on PATH | which -a terraform; tfenv/asdf rehash |
| Init slow every time | Plugin cache disabled or cleaned | Set TF_PLUGIN_CACHE_DIR consistently in team docs |
Provider registry unreachable | Proxy or DNS | Export proxy vars; test curl registry.terraform.io |
| Lock file merge conflict | Two branches upgraded providers | Pick one side; run terraform init locally; commit resolved lock |
| M1/M2 Mac vs Linux CI checksum mismatch | Cross-platform team | Commit lock with multiple platform hashes (Terraform adds them on init per OS) |
Summary
Installing Terraform means pinning the CLI and understanding that providers arrive at init from the Registry into .terraform/providers/. You verified versions, declared required_providers for local and null, initialised the project, and captured plugin path evidence. Next, run the full daily loop: Terraform Workflow: Init, Plan, and Apply.
Interview Questions
1. What is the difference between installing Terraform and running terraform init?
Reveal answer
Installing Terraform places the core CLI binary on the system. terraform init prepares a specific project: downloads provider plugins and modules per required_providers, configures the backend, and writes .terraform.lock.hcl. You can have Terraform installed globally while a new clone still needs init before plan/apply.
2. Where do provider plugins live, and when are they downloaded?
Reveal answer
Providers download during terraform init (or init with -upgrade) into .terraform/providers/, organised by registry hostname, namespace, name, and version. They are per-project unless using a shared plugin cache. The CLI loads them at plan/apply time based on configuration.
3. Why commit .terraform.lock.hcl but gitignore .terraform/?
Reveal answer
.terraform.lock.hcl records exact provider versions and checksums for reproducible init across laptops and CI — small, reviewable, security-relevant. .terraform/ is a regenerable cache of plugins and module downloads — large and machine-local. Losing lock file causes inconsistent provider resolution; losing .terraform/ is fixed by re-init.
4. How would you manage multiple Terraform versions across projects?
Reveal answer
Use tfenv (.terraform-version per repo) or asdf (.tool-versions), or CI container images pinned per pipeline. Each root module’s required_version must accept the active CLI. Document upgrade process: bump pin, run full plan in non-prod, update CI image, communicate breaking changes from release notes.
5. What does the Terraform Registry provide?
Reveal answer
The public Terraform Registry hosts provider and module packages with versioned releases, documentation, and download URLs used by init. required_providers source addresses (e.g. hashicorp/aws) resolve here by default. Private registries use custom hostnames in source with the same init flow.
6. Explain required_version vs required_providers version constraints.
Reveal answer
required_version constrains the Terraform CLI binary. required_providers constrains each plugin (e.g. AWS provider 5.x). Both use constraint syntax (>=, ~>, =). Init fails if CLI or resolved provider violates constraints. They solve different problems — never confuse CLI 1.9 with AWS provider 5.40.
7. A CI job fails with “terraform validate” before init. Is that valid?
Reveal answer
terraform validate needs provider schemas loaded — typically after init. CI should order: checkout → install CLI → terraform init -backend=false (for pure config validation) → fmt -check → validate. Skipping init causes missing provider schema errors. Backend=false skips remote state setup when only syntax is tested.
8. How do you verify a Terraform zip download is trustworthy?
Reveal answer
Download from releases.hashicorp.com, compare SHA256 checksums published alongside the release, and optionally verify GPG signatures using HashiCorp’s signing key. Never use unofficial mirrors in production. Package repos (apt/yum) should use HashiCorp’s signed repository instructions.
Related Tutorials
- Terraform course index
- Previous: Introduction to Terraform and IaC
- Next: Terraform Workflow: Init, Plan, and Apply
- Providers and the Terraform Plugin Model