Helm Architecture and Components
Overview
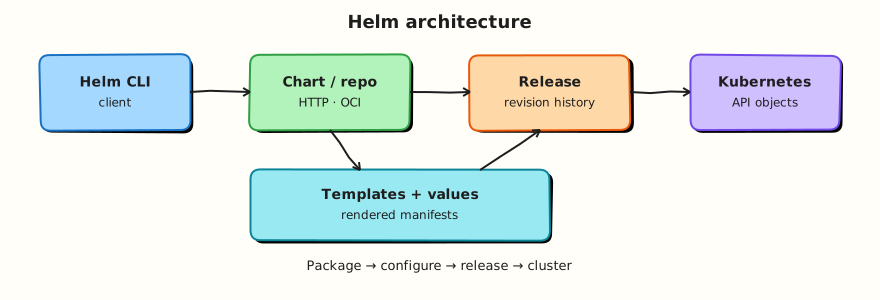
Trace CLI → chart/repo → template render → release → Kubernetes API, and name the main Helm components.
Helm 3 is a client-only tool (no Tiller). It talks to the Kubernetes API, stores release metadata as Secrets/ConfigMaps in the cluster, and renders Go templates with values.
This is a core tutorial in Module 1 · Helm Fundamentals of the REBASH Academy Helm for Kubernetes Engineers series — written for Cloud, DevOps, Platform, and SRE engineers.
Prerequisites
Learning Objectives
By the end of this tutorial, you will be able to:
- List CLI, chart, repo, release
- Explain client-only Helm 3
- Describe where release history lives
- Outline HTTP vs OCI chart sources
Architecture
This topic’s control points and relationships are shown below.
Theory
What it is
Helm’s architecture is intentionally simple in Helm 3: a client-only CLI that talks to the Kubernetes API. There is no in-cluster Tiller (that was Helm 2). The main pieces you reason about are the CLI, the chart package, the chart source (HTTP repository or OCI registry), the release record, and the Kubernetes API that receives rendered objects.
| Component | Role |
|---|---|
| Helm CLI | install, upgrade, rollback, template, lint |
| Chart | Metadata + templates + default values (+ optional deps) |
| Repository / OCI | Publish and pull chart packages |
| Release | Named install with revision history in the cluster |
| Kubernetes API | Authoritative store for Deployments, Services, and friends |
Why it matters
Understanding the flow prevents a common ops mistake: treating Helm failures as “mysterious cluster bugs” when the failure is often render-time (bad templates/values) or apply-time (RBAC, admission, resource conflicts). Knowing that release history lives in the cluster also explains why deleting a namespace can erase Helm history, and why CI identities need permissions both to create workload objects and to manage release Secrets/ConfigMaps.
How it works
Mental model: CLI → fetch chart → merge values → render templates → apply manifests → store release revision.
- You point Helm at a kubeconfig context (same as
kubectl). - Helm resolves the chart from a local path, an HTTP repo index, or an OCI reference.
- Values are merged (chart defaults, then
-ffiles, then--set). - The template engine produces YAML documents.
- Helm applies them (create/update/delete as needed for the release).
- Metadata for that revision is stored in-cluster so
helm historyandhelm rollbackwork later.
helm template stops after step 4 — invaluable for review without touching the cluster. helm install / upgrade continue through apply and release storage.
Key concepts and comparisons
Helm 2 vs Helm 3: Helm 2 ran Tiller in the cluster with broad privileges; Helm 3 removes Tiller and uses your kubeconfig credentials. Prefer Helm 3 everywhere.
HTTP repos vs OCI: classic helm repo add uses an index.yaml over HTTPS. OCI charts live in registries (helm push / helm pull oci://…) and fit enterprise artefact pipelines beside container images.
Common pitfalls
- Assuming Helm stores charts in etcd forever — it stores release records; charts are fetched at install/upgrade time.
- Confusing chart version (package SemVer) with the image tag inside values.
- Expecting
helm templateto catch every cluster error — admission webhooks and quotas only appear on apply. - Forgetting that hooks and CRDs have special lifecycle rules compared with ordinary templates.
Hands-on Lab
Objective
Inspect the Helm CLI environment, register a chart repository, install a probe release into a kind cluster, and prove release metadata is stored in-cluster as labelled Secrets.
Prerequisites
- kind cluster running (
kubectl cluster-info) - Helm 3.x installed (
helm version) - kubectl configured against the kind context
- Network access to add a public chart repository (bitnami)
Lab environment
Workspace: ~/rebash-helm/module-01-arch on your workstation with a disposable kind cluster.
mkdir -p ~/rebash-helm/module-01-arch/probe/templates && cd ~/rebash-helm/module-01-arch
kubectl cluster-info | tee cluster-info.txt
Real-world scenario
You are onboarding to a platform team that documents Helm architecture for auditors. Before any production chart installs, you verify CLI version, repository configuration, and kubeconfig context — then install a tiny release and inspect where Helm stores revision metadata in the cluster.
Step-by-step tasks
Task 1 – Verify CLI and cluster context
cd ~/rebash-helm/module-01-arch
helm version | tee helm-version-m01arch.txt
helm env | tee helm-env-m01arch.txt
kubectl config current-context | tee kube-context-m01arch.txt
kubectl get nodes -o wide | tee nodes-wide.txt
grep -q 'v3' helm-version-m01arch.txt
grep -q Ready nodes-wide.txt
Expected output
helm-version-m01arch.txt shows version.BuildInfo{Version:"v3.; all nodes are Ready.
Task 2 – Register a repository and list indexes
cd ~/rebash-helm/module-01-arch
helm repo add bitnami https://charts.bitnami.com/bitnami
helm repo update | tee repo-update-m01arch.txt
helm repo list | tee repo-list-m01arch.txt
grep -q 'bitnami' repo-list-m01arch.txt
helm search repo bitnami/nginx --versions | head -5 | tee search-m01arch.txt
Expected output
repo-list-m01arch.txt includes bitnami with URL https://charts.bitnami.com/bitnami; search returns versioned nginx charts.
Task 3 – Install probe release and inspect release Secrets
Create namespace.yaml:
Create probe/Chart.yaml:
Create probe/templates/configmap.yaml:
apiVersion: v1
kind: ConfigMap
metadata:
  name: {{ .Release.Name }}-probe
data:
  purpose: architecture-lab
Install and prove release metadata:
cd ~/rebash-helm/module-01-arch
kubectl apply -f namespace.yaml
helm upgrade --install arch-probe probe -n rebash-helm-m01-arch --wait --timeout 120s | tee probe-install-m01arch.txt
kubectl get configmap -n rebash-helm-m01-arch | tee probe-configmaps-m01arch.txt
kubectl get secrets -n rebash-helm-m01-arch -l owner=helm | tee release-secrets-m01arch.txt
helm list -n rebash-helm-m01-arch | tee helm-list-m01arch.txt
helm history arch-probe -n rebash-helm-m01-arch | tee helm-history-m01arch.txt
grep -q 'arch-probe' helm-list-m01arch.txt
grep -q 'sh.helm.release' release-secrets-m01arch.txt || test -s release-secrets-m01arch.txt
Expected output
Release arch-probe is deployed; release-secrets-m01arch.txt lists Helm release Secrets labelled owner=helm.
Task 4 – Break and fix a failed upgrade
Simulate a bad values override, observe failure, then recover:
cd ~/rebash-helm/module-01-arch
helm upgrade arch-probe probe -n rebash-helm-m01-arch --set replicaCount=not-a-number 2>helm-upgrade-fail-m01arch.txt || true
grep -qi 'error\|invalid\|failed' helm-upgrade-fail-m01arch.txt
helm upgrade --install arch-probe probe -n rebash-helm-m01-arch --wait --timeout 120s | tee helm-recover-m01arch.txt
helm status arch-probe -n rebash-helm-m01-arch | tee helm-status-m01arch.txt
grep -q 'deployed' helm-status-m01arch.txt
Expected output
Bad upgrade fails with a clear error; recovery leaves release status deployed.
Validation steps
-
helm versionshows v3.x client - kind cluster nodes are Ready
-
helm repo listincludes bitnami - Release
arch-probeinstalled inrebash-helm-m01-arch - Release Secrets labelled
owner=helmvisible - Failed upgrade recovered to
deployedstatus
Common errors and fixes
| Error | Cause | Fix |
|---|---|---|
helm repo add fails | Network or TLS | Check proxy; retry with helm repo add bitnami https://charts.bitnami.com/bitnami |
Unable to connect to the server | kind not running | kind create cluster --name rebash-helm |
| Install fails watch timeout | Image pull or probes | kubectl describe pod -n rebash-helm-m01-arch |
| No release Secrets visible | Wrong namespace | Re-check -n rebash-helm-m01-arch |
Challenge exercise
Add a values.yaml to probe/ with replicaCount: 1 and re-install with helm upgrade --install arch-probe probe -n rebash-helm-m01-arch -f probe/values.yaml. Prove the values file appears in helm get values arch-probe -n rebash-helm-m01-arch.
Learning outcomes
- Verified Helm CLI and kind cluster readiness
- Registered and searched a chart repository
- Installed a release and inspected in-cluster Secret storage
- Recovered from a failed upgrade attempt
Cleanup
helm uninstall arch-probe -n rebash-helm-m01-arch 2>/dev/null || true
kubectl delete namespace rebash-helm-m01-arch --ignore-not-found
helm repo remove bitnami 2>/dev/null || true
Validation
- Lab commands run under
~/rebash-helm/module-01-arch/ - You can explain each Theory section in your own words
- You used modern tooling where it applies to this topic
- You can describe one production failure mode for this topic
Code Walkthrough
Production practice for Helm Architecture and Components always combines:
- Inspect before you change (status, plan, logs, dry-run)
- Prefer reversible, documented changes (Git, IaC, drop-ins, version pins)
- Capture evidence (command output, pipeline logs) for handovers
- Prefer current tools and APIs over legacy shortcuts
- Least privilege — escalate credentials only when required
Keep runbooks short enough to follow under pressure. Automate checks; keep humans for judgement.
Security Considerations
- Treat credentials and tokens for helm as privileged — never commit them
- Prefer short-lived auth (OIDC, roles, SSO) over long-lived keys
- Validate blast radius before apply/deploy/delete operations
- Restrict who can approve production changes
- Collect audit logs; limit who can read sensitive traces
Common Mistakes
Assuming Helm stores charts in etcd forever — it stores release records; charts are fe
Validate assumptions against the Theory section and official docs before changing production.
Confusing chart version (package SemVer) with the image tag inside values.
Lab shortcuts (open security groups, admin roles, skip approvals) must not ship unchanged.
Changing production without a rollback path
Always know how to revert (previous artefact, prior release, state rollback, DNS failback).
Best Practices
- Encode Helm Architecture and Components changes as code and review them in pull requests
- Pin versions (images, modules, actions, provider plugins)
- Separate environments with clear promotion gates
- Alert on symptoms with runbooks attached
- Destroy lab resources; tag everything with owner and expiry where possible
Troubleshooting
| Symptom | Likely cause | Fix |
|---|---|---|
| Auth / permission denied | Wrong identity, policy, or scope | Check caller identity, roles, and least-privilege policies |
| Timeout / no route | Network, DNS, security group, or endpoint | Trace path, DNS, and allow-lists before retrying |
| Drift / unexpected plan | Manual change or wrong state/workspace | Reconcile desired vs actual; avoid click-ops on managed resources |
| Pipeline/job red | Flaky step, cache, or missing secret | Read failing step logs; bisect recent workflow/config changes |
| Cost spike | Idle load balancer, NAT, oversized compute | Inventory billable resources; stop/delete labs promptly |
Summary
Helm Architecture and Components is essential for Cloud and DevOps engineers working with helm. Practise the lab until the inspection and change path is muscle memory, then continue the track.
Interview Questions
- What are the main directories inside a chart?
- Where does Helm 3 store release metadata?
- What role do helpers (_helpers.tpl) play?
- Why was Tiller removed, and what security benefit followed?
- How does the chart version relate to appVersion?
Sample answer — question 2
Release metadata lives in the cluster namespace as Secrets labelled for Helm, not in a central Tiller. That design keeps RBAC scoped to the namespace where you install.
Sample answer — question 4
Removing Tiller eliminated a powerful in-cluster shared server. Helm 3 uses your kubeconfig credentials directly, so RBAC of the caller matters.